Sunday, November 8, 2009

Prima Products Picks Giveaway!!! Take 2


My favorite color in the whole world is YELLOW. I love the warm tones of yellow and orange. So when I saw THIS I was in heaven. Prima is giving away some gorgeous flowers and you will want to hop over there and try to win some.

I hope I win!! Good luck to you!!! (No you are not seeing double this is the same post as in my other blog. I am trying to increase my chances of winning. :)

tereza

Sunday, November 1, 2009

Making your own cut outs or die cuts.

If you are like me, you are always looking for shortcuts to make your scrapbooking easier and more fun.

One of the things I have been using are digital images. If you do a search you can find all kinds of vintage images available at very low cost. Once I purchase them, I can then print and use them as many times as I need to. I can use them as cut outs or print them on transparencies and use them as 3D embellishments.

Here are a few examples.


You can then add glossy accents to them, glitter, or doodle on them. You can mat them on cardstock and cut them out as stamps. OR you can mat them on chipboard and make thicker die cuts out of them. Pop them up with pop adhesives. The sky is the limit and they are always available at the press of your mouse and the availability of your printer.

To see my latest custom work where I used butterflies printed off my printer look HERE.

Enjoy!!!

Tereza

Tuesday, October 27, 2009

Another Giveaway at Crop Spot!!!


I have been busy and have some wonderful news. You can see them on my other blog HERE and HERE!!

Now for the other news...Crop Spot is doing another Give Away! I just purchased some awesome Webster Pages Christmas papers and I am looking forward to creating my own Christmas album. although it was a struggle to decide between Webster Pages and Graphic 45 papers, so I am glad that Crop Spot is giving away the Graphic 45 Christmas papers. I want to win!!! :)

make sure you go check it out too.

have a great day!!!

Tereza

Monday, September 28, 2009

Awesome Giveaway at Crop Spot!

Have you been wondering what happened to me? Well, you can read about it HERE.

I am still trying to scrapbook. I have managed to clean out my scraproom. I will try to post photos and a card I made some time soon. In the meantime, I am hoping this awesome Give Away will get me inspired!!

I am looking forward to finding out the baby's sex. Maybe this week or the next. :) I will keep you posted.

Blessings,
Tereza

Thursday, June 4, 2009

My New Scraproom or should I say Studio?

I have been for a long time waiting on my husband to allow me to transform the dining room that we don't use, into my official Scrap room or Studio. Well, he finally gave in, and not only that, he is building from scratch the room I wanted. :)

Here are some BEFORE pictures for you to see where I have spent my time Creating Treasures.


This is my dining room table. Behind it, against the wall there was a china cabinet that is already gone. As you turn left and left you see the other photos and the place where I stock my tools, embellishments, flowers and ready items.


Below you will see my husband at work: building my new table from scratch and the finished result. No, he does not have a wood shop. He used our drive way to build my table.


I had no clue that my husband had such awesome carpentry skills. I am so happy and so thankful. After he finished the table I convinced him of putting a shelf on the wall for me and I am hoping that one shelf will turn into 2. Little by little I am taking ground. :)

Next week I will share the final results with the table and shelves in the room!! Can't wait!

Thanks for looking

Tereza

Friday, May 22, 2009

Cards for Heroes Blog Hop


****Memorial Day Update - some people on the comments asked how did I know that the RED CARD in the soldier's hands was mine. Earlier on there was a bigger photo on CFH blog and I was really able to see it closely and it is mine. Below is a bigger picture of one of the cards I sent. And like I describe below on my original post I cut up pieces of a Christmas fabric and machine stitched to a red cardstock and hand stamped Merry Christmas on the inside. there were many different images on the fabric: Snow man, Christmas tree, bells, angels and with them the Christmas wishes for Joy, Peace, Love etc. I was so happy to see the fruits of my labor and it really motivated me to keep making more cards to send to them. It really takes very little to make someone's day.***********


If you follow my blog or have been here before you might have noticed my little banner on the sidebar of my blog for Cards for Heroes. Cards for Heroes is an organization that donates cards to our soldiers abroad so they can send hand written notes to their loved ones here back home. They also provide encouraging cards to our wounded heroes helping out another organization that provides quilts and other needed personal items to the soldiers that are wounded and have to be transported to a hospital.

I have become involved with this organization and have sent some cards to them a couple of times. My daughter and I got busy and made a bunch of them, as well as Christmas cards last year. If you would like to see some of them and the tips I shared please click HERE.

so I am participating on a Blog Hop to help promote this organization and get more people involved. Please check out their website for more information.

You don't need to be an expert card maker to join, or send dozens of cards. Just do a little or as much as you can. There are so many creative ways you can help. If you don't want to make cards, you can donate supplies, send a few dollars to help out with shipping, sign AnyHero cards...there is so much to do.

I have recently started collecting the cards that don't sell in my shop and I am sending them over. You see that red card in the hands of that hero on the first photo on this post? It's my card!! That is a Christmas card that I made using some donated red cardstock. I cut up some Christmas fabric that had cute pictures on them with sayings like Peace, Joy, etc and I machine stitched them to the cardstock. Them my daughter and I hand stamped MErry Christmas on the inside of them and they were ready. We sent over 50 cards. They were simple, cute and it was a great opportunity to do some bonding with my little one.

Have I convinced you yet? :)

I hope so...now if you would like to see who else helps out please check out Bonnie Rose's blog. She is an avid scrapbooker and makes awesome little albums as well as gorgeous cards.

Have a great weekend and don't forget to celebrate the heroes that have given their lives for this country! :)

Tereza

Sunday, May 17, 2009

How to stretch your Say it with Crystals Flourishes

I was trying to figure it out how to make my crystal flourishes last longer and I found THIS.

Lynn is an avid scrapbooker and an artist and extremely creative. I just had to mention her incredible idea. :) Thanks Lynn for sharing. I will definitely try it and post a picture of my finished work.

Have a great week. :)

Tereza

Wednesday, April 29, 2009

BLOG Candy ALERT!!

oh, my...there are so many generous ladies out there this month...The list of Blog Candy is a long one...so check them out...


1) Chelsea from Crafting Life's Pieces is giving an awesome kit with K&Co paper pads and Prima flowers... you can't miss it.

2) Debbie from Passion for Crafts is giving a mighty kit with Copic markers, Prima flowers, Nestabilities and more. Go check it out and take a peek at her amazing cards too!

3) Mary is giving away another great assortment.. check it out HERE.

4) If you like stamping, coloring with Copics and beautiful patterned paper you got to check Steph's gorgeous blog Much Ado about nothing. What a fun name!! Thanks, Steph.

5)One more awesome blog Candy at Bearly Mine Crafts...:)

6) Last Blog Candy of the night: Created by Gracie is giving some delicious candy!! go check her out and her pretty little girl!! :)

Enjoy and don't forget to stop by CreatingTreasures to see what I have been up to. :)

have a great night. :)

Tereza

Monday, April 27, 2009

How to add dimension to your scrapbook pages with Distressing techniques.

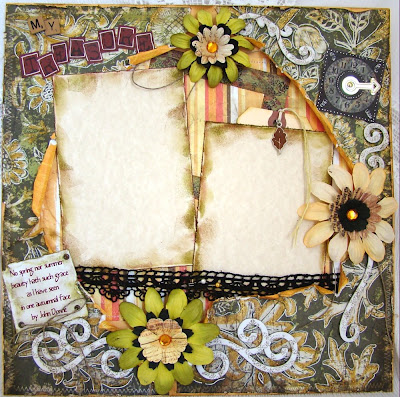
I just finished a custom order for a page layout I did last year. I have created this page 3 times... of course, not exactly the same. you will see here all the pages, in their order of creation. The last one is the one I just finished last night.


Were you able to pick up the subtle differences??

Well, I wanted to share with you how to add dimension to your pages. For this layout I used a textured cardstock base, then a patterned paper that shows behind the mats and lastly another patterned paper that goes on top. Can you see those 3 layers?

Next I tore the green patterned paper, wadded it into a ball so that it would crinkle. Do it gently so it won't tear on the inside, if the edges tear a bit, it's ok. then I smooth the paper out and glue the edges to the textured cardstock base.

After it's glued down, the center will be open so you can insert your mats or photos. I stitched all the edges, highlighted the darker leaves with a white gel pen, and added golden glitter to the orange parts of the paper. The edges of the paper was also distressed with the help of a pair of scissors. I also curled the inside of the paper.


Can you see all the dimension that that brought to the layout?

After that I worked on my chipboard flourishes. I painted them white and stamped them with distressed ink. I then layered my flowers: a mix of silk flowers and Prima flowers. I also printed out my title and poem. I added a black ribbon or lace to make the photos pop.

This is one of my favorite pages. I have kept the first one to myself and it has photos of my children gathering leaves in the front yard. The other pages went to two customers that requested them to be made again. :)

I am so glad I did. :)

I hope you enjoy the techniques and make sure you click on the pictures to see them enlarged.

Tereza

Sunday, April 19, 2009

Stamping your Ribbons

I just returned from a week at the beach. While I am so grateful for the relaxing time, I am glad to be home. :)

I don't know if this is an old topic or technique for you, but before I left for the beach I created a card and stamped some images on the ribbon that I used on the card. Oh, I just loooooved the result.


I used StazOn Jet Black Ink and some bird stamps.

I will share the rest of the card later on this week as well as another stamping technique. What would you say if I told you, you could create NEW stamped images with your OLD stash??

So follow me or sign up to know when I post again.

Have a great week. :)

Wednesday, April 8, 2009

New Stamps using your Old Stamps

ok...I am hooked on stamps...I can spend hours looking at all the wonderful websites that have these gorgeous stamps. I am specially fond of the vintage, grunge, collage style ones. Love flourishes and the ephemera look.

But, unfortunately, it is just not practical to buy every one of them. I don't have the room and I don't have the money.

So there are many options to have new stamped images without having to clutter your craft room with new stamps. One that I really like is creating new images with your old ones.

I used these stamps.


and created these images..


Now for you to make these, you will need to create some masks. What is a mask? It's an image that you can use to protect a certain area from getting inked, or an image that you use to get a certain area inked. See Scrapperlicious for more on masks or Tim Holtz, for that matter. LOL

So just stamp the images you will use again...these were my masks. After I stamped them, I cut them out.


Here are the steps:

1) I stamped the flower with the Happy Spring text first.
2) Then I put the mask on top of it. Then I stamped the journaling circle on top of it, and added that mask on top of that.
3) Lastly, I stamped the flourishes. Depending on the look you are going for, you might want to lift the circle mask and stamp the flourishes on some of the edge of the circle.

Here is the result...


And here is the card I made using my NEW stamp...


As you see the sky is the limit... you can create many different images with the few stamps you might have at hand.

Next time you are bored with the stamps you have, try making new images with them. :) Enjoy!!!

Tereza

PS...if you would like to purchase this card, please click HERE.

Making your own Liquid Pearls

I have never had Liquid Pearls in my hands. But I have seen enough projects created with it to know that I want some. I have read some articles about how to use Puff paint or Fabric paint and how it has the same or similar effect as the Liquid Pearls made by Ranger. I don't know because I haven't used any of the products mentioned.

However I did buy a couple of months ago a bottle of Pearl Metallic White acrylic paint and Glossy Accents from Ranger. So after looking at many projects and what liquid pearls look like on them and reading the articles about the cheaper stuff, I thought I give it a try and make my own liquid pearls.

Now from what I concluded from the information I gathered Liquid pearls would be a paint that has shimmer and dimension and you end with a droplet of paint that resembles a real pearl. So I thought, "I use my Glossy Accents to create water droplets." Look at this photo. Be sure to click on the photos to enlarge them and see the details.


The water droplets here were created just by adding drops of Glossy Accents. When it dries it holds its shape and you have a water droplet. There are many different uses for Glossy Accents. You could have a whole afternoon of fun just with it. But I decided to go a little further. :)

Here is what I used.


So I mixed both together. I would suggest you start with very little. Get a paper plate and add a dab of acrylic paint and 2 dabs of Glossy accents. Stir until they are well mixed and use the tip of a paint brush's handle or a crochet needle to dab into the mix and start making little dots.

If you want round, plump, dimensional pearls be generous with the amount of goo you put on the end of your needle or brush. You can even go back and place more on the same place. Try one or two pearls and let them dry. As they dry you will see if they are holding their shape or not. If they start to go flat you will need to add more Glossy accents to your mix. It's trial and error job but after you get the hang of it, you will have your own recipe depending on the look you are going for. :)

I got this result with my experiments, and I was pretty happy with it since I wanted a subtle appearance.


I really liked the shimmery look and dimension without having to spend any extra money or waiting for my Liquid Pearls to arrive in the mail.

Now you try and have fun!! Let me know what kind of results you have. :)

Tereza

Tuesday, March 24, 2009

Digital and Hybrid Scrapbooking: is it worth the money?

A few months ago my husband made a huge investment (huge for me that don't like to spend more than $100 at a time on anything) and bought us an Adobe Suite. It has the famous Photoshop program as well as other programs for making illustration and other digital work. It is a fantastic software. Of course, as anything computer wise, you need to invest time on it, to learn how to use it. I have been slowly learning it and incorporating it into my card making, scrapbooking, altering art.

If you would like to see what I have been making please check out my other blog. Under the Digital ART label you will find the posts where I am showcasing my treasured creations.

Although your initial investment to go digital may be greater than with traditional scrapbooking, the good thing about it is that your resources never end. Let me explain. How many times have you bought a favorite paper collection and after using it on a couple of projects they were gone? You either went and bought more to use it again, or to hoard it so that you would always have it. :)

Well with digital, you have it forever (unless your hard drive crashes and you didn't back up the files. That's another story for another day!) anyway... as long as you have a printer so you can print your digital file or a screen where you can see it, you will have your digital papers, brushes, embellishments forever.

Now for a paper hoarder like me, that is HEAVEN!!! So I am definitely a Hybrid scrapbooker. Now, go take a look at some of the things I have already created and get inspired.

I will be sharing some of my knowledge as I discover more and more of the wonderful digital world!! So, have you dared into the digital world yet?

Would love to hear from you. :)

Tereza

Thursday, March 12, 2009

Think long term instead of instant reward.

ok, so I am always trying to save a buck, right? Now, with so many tools, gadgets and the newest electronic devices that will cut, emboss and whatnot your papers, acrylics, chipboard and more, it is really hard not to fall prey of every trend that comes around.

If you got tons of money and storage space, then go ahead and indulge. But if you are like me, you don't have the extra money to spend on this hobby and your craft room is over flowing with stuff.

So, whenever I want to buy something new, I follow these steps:

1) It needs to be in my budget. I cannot go into debt because of it.
2) I research prices, specifications, reviews and whatnots about the product. I wait. I never buy something immediately. Usually it takes me months to make a big purchase. If I am convinced that I still want it, I go to step 3.
3) It needs to be something I will use again and again. I will not fall for an impulse purchase to buy a gadget that will sit and gather dust. So, if I have to, I will try to see it in action, ask people that have it what do they use it for, how often, what are the expenses with replacements etc etc.
4) So after all that, I can tell you that the most expensive thing I own that I use DAILY in my craft is my computer, my trimmer and my punches. LOL

How about you?? what is the most expensive gadget you got? and do you use it EVERY TIME you sit down to craft??

Love to hear your comments. :)

Tereza

Saturday, March 7, 2009

Creating new flowers using the ones you got!!

This past week I had a customer that requested some bridesmaids cards using a pear and plum color scheme. While creating different designs I inked some of the white hydrangeas I had with Dusty Concord distressing ink pad from Tim Holtz.

Here is the result...


Don't they look good?

So next time you have a need for a certain color try inking them with distressing ink. Just use a make up sponge and dab the ink and then on to the flower until you get the color saturation you are looking for. very easy. :)

I will share some more flower techniques this coming week. :)

Tereza

Tuesday, March 3, 2009

NEW Look for my blog!!

Hi everyone,

We have been sick here at home. My hubby is fighting the flu. I made him stay home from work today. Praise the Lord he is an obedient husband!! LOL

Sorry for the lack of posting. I promise to share some cool techniques next week. In the meantime, enjoy the new look and the lovelies in my other blog.

God bless,
Tereza

Sunday, February 22, 2009

BLOG Candy ALERT!!

If you like Basic Grey papers and other great goodies you need to check out this blog candy!!

have a great week :)
Tereza

Saturday, February 14, 2009

Making your own flowers

Have you seen the new released Prima flowers?? They are gorgeous!

Prima had the bright idea of incorporating the layering and vintage look that many artisans have been using on their altered art and handmade items for a long time in their NEW FLOWERS. They are using fabric, beads, tulle, felt, ribbon and other notions to layer their flowers. They look so yummy and you just need to get some!

Oh, wait a minute! That's right you don't NEED to buy some, you can MAKE some! SO if you are short on resources or just practicing being a good steward of what you have then you should use what you got!! I bet you got some beads, fabric, ribbons that you can turn into gorgeous flowers in no time!!

Here are some photos of recent flowers I have created in my items just using what I had. I used the Prima flowers I had in my stash and added my own handmade ones, pieces of tulle, ribbon, doily and other stuff to them. I will be talking about some of these techniques, so if you would like to learn them, please come back. Sign up for my newsletter or follow the blog to know when I post.

Enjoy the photos and have a great weekend!! oh, stop HERE for a chance to win some Blog Candy!!


Saturday, January 31, 2009

12x12 Custom page is DONE!!!

hi Everyone,

this is a quick post to show you the result of that custom order I had for a 12x12 scrapbook page. Be sure to click on the photos to enlarge them and see the details. :)

This is the original layout.


My customer asked me to duplicate it. Unfortunately that is just not possible for me. But I came pretty close. I painted and transformed the chipboard scrolls I had at home, and I also distressed the eyelet brads I had. Click on the colored links to learn how you can do the same.

Here is the result of the layout. After I painted the scrolls I stamped on them to complete the look I was going for. Would love to hear your comments!! thanks :)


Friday, January 30, 2009

Distressing and inking eyelets and brads!!

I am working on a new layout. Click HERE to read the post I talk about it.

So, I needed some dark distressed eyelet brad. All I had was bright colored ones. so, I used a nail filer and sanded the one I had. You will see in the photo, it is a blue one. Then I inked it with Distressed walnut ink.

In the photo, the first brad on the left is the original color, then sanded and the last one, sanded and inked. Come back to see how I used it on the layout!!


Also this is an eyelet that has a backing of a brad, so you don't need to set it. All you have to do is punch a hole and put the eyelet brad in the hole and fold the little legs behind the paper like you would a brad.

I want to make a little confession here: I have never set an eyelet. LOL

So next time you need some metal embellishments and all you have are COLOREd ones sand them. Use a nail file or sand paper, whatever you got on hands!!

Enjoy! Would love to hear your comments if any of my tips are helping you out at all!! :) Thanks.

tereza

Coloring and using the Chipboard at hand!!

I am at the moment working on a custom 12x12 page. The customer saw a page I made in the past and asked me to duplicate it. I kindly explained to her that I would be glad to make another one for her, but it would NOT be exactly the same as the first.

I have a very hard time duplicating any of my work because most of it comes out of pure inspiration of the moment. So while, I can use some of the same papers and products and maybe keep with the same sketch, the layout will have a very different feel from the first because that is just how it is with a creative spirit.

I will post the finished layout later with the original for you to see what I mean.

Now, the hurdle I found with this layout is that I used some chipboard scrolls that were white and I don't have any more of those. So, using my thinker, I decided to paint the scrolls I had. They were in a variety of colors and I painted them all white, as you can see on the photo.


Some of the scrolls were flocked and had bright colors so I had to use a second coat of acrylic paint. Once it dried all I did was punch them out of their sheet. They came already with adhesive in the back. I did not worry about the chipboard being perfectly painted since it will be stamped. I will show you the results next week.

So, next time you need a chipboard letter or any other embellishment in a color you don't have, just paint it. :)

Enjoy!!

Tereza

Wednesday, January 28, 2009

and the Winner is...

Hi everyone, I am sorry I kind of fell off the face of the Earth, but I am still here. :)

the winner of my first give away is VITTORY. I will be sending you 4 chipboard puzzle pieces ready for you to create an album. Please email me at mytreasuredcreations@gmail.com with your address and name so I can ship the pieces to you. You have until February 05, 2008 to contact to claim your prize. If I don't hear from you I will draw another name. Thanks to everyone who participated.

Please check back I will be posting more tips this coming weekend.

Tereza

Wednesday, January 14, 2009

My first Blog Candy: Chipboard Puzzle Pieces

This is my first blog candy in my new blog. :)

I have seen a lot of people looking for these so I decided to offer them to you: 4 chipboard puzzle pieces. They measure 8x9" and come painted with black acrylic paint. They are all the same, but if you overlap them in different directions they end up looking like each piece is unique. Check out all the photos to see the details. The card on top of one of the pieces measures 4.25x5.5".


They come without holes or book rings so that way you can use them any way you like. When punching the holes make sure you line up the pieces so that your holes are on top of each other.

Each piece was hand cut and hand painted by me. I made sure that the edges were sanded and are smooth, but I am human so I can't promise perfection.

So what you have to do to get these? Leave me a comment on this blog, add a link of this blog candy on YOUR blog (if you have one) and EITHER follow the blog or sign up for my newsletter. It's important that you leave me an email so I can contact you. IF you sign up for my newsletter I will have your email address, or if you link me to your blog I will have a way to contact you. :) That easy!!

If you are in a hurry to get these, you can find them in my Etsy SHOP.

Look HERE to see the album I did with these same pieces.

I will draw a winner on January 24th, 2009 at midnight CT.

Thank you for participating and have fun!! :)

Tereza